Search Her kitchen and crafts

Thursday, February 9, 2012

Checkered Cake

Hey everyone, welcome to the first official post of February, a few days late but its better than an empty promise!

A year ago this month I received an awesome gift, a checker board cake pan set, before this cake I had only tried it once.  So last week, I "dusted" it off and get to work. I took the lazy route though and used boxes of cake mix to complete this project.

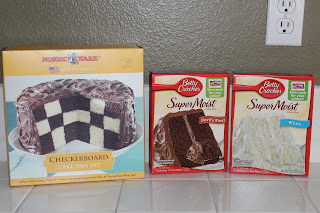
First things first, make sure you have everything you need!


Insert the divider into the pan and decide how you want to cake too look, you will have two layers that are patterned the same way. 

Fill your cake plans according to the plan, starting with the center, be careful not to let it drip into the center section too much! 
After you have completely filled you pan remove the insert carefully. Repeat this process until all 3 of your pans look something like this...


Bake your cakes according to the directions on the box. Lightly frost between the layers of the cake, and frost the outside as you normally would. I chose a homemade chocolate buttercream because its delicious!  

When your through, enjoy the beauty of your cake! 


This is a really simple and fun way to impress people. The hardest part really is filling the pan! I ended up pouring my batter into measuring cups with a pour spout. 


-Courtney

P.S. I totally tried to make my white cake pink by using a bit of red food coloring. It would have turned out better if I'd have used pink, however my dog decided to eat my pink food coloring right before I used it. 


Tuesday, January 31, 2012

February!!!

Well another month has passed and I totally failed on updating this blog. Please stick with me as I try to expand this blog, and maybe even launch a small business. I've got some deliciousness planned for this month! Keep coming back for more!

Sunday, January 29, 2012

Homemade Marshmallows

So about a year ago, I was researching how marshmallows are made.  Then I stumbled upon a post on Smitten Kitchen about making your own marshmallows. I found my recipe there although I have seen it in several other places. This was pretty easy until I did not let the sugar and gelatin mixture mix long enough. I didn't notice and continued to make the marshmallows. So I had to try it again, the first portion of the pictures are from my first attempt, the rest from the second. Here goes nothing! 


Ingredients: 
Approximately 1 cup powdered sugar
3 ½ envelopes unflavored gelatin
1 cup cold water
2 cups granulated sugar
 ¼ tsp. salt
2 large egg whites
1 tbsp. vanilla
A few drop s of food coloring to spice things up
9x13 in. pan and a standing mixer or hand mixer. 


Your first step is going to be to oil your pan and sprinkle powdered sugar on top of it.  Make sure to get the sides too.


Pour 1/2 the water into the mixing bowl and sprinkle the gelatin over it.


In a sauce pan heat the sugar, corn syrup, 
the second half of the water, and salt on low heat.  
Stir with a wooden spoon until the sugar is dissolved. 
Increase the heat and boil the mixture until the temperature reaches 240 degrees. 
This took me about 10 minutes. 


Pour the mixture over the gelatin mixture. Stir until the gelatin is dissolved. 


Beat the mixture until it is 3x its original size. (This is where I went wrong the first time.)
Beat the egg whites until they hold stiff peaks.
Mix the egg whites and vanilla into the mixture.


Pour the mixture into the pan and sprinkle powdered sugar over the top.
Refrigerate for at least 3 hours.
All picture above are from attempt #1, looking back on this photo I should have known they weren't going to turn out.


When done properly this is what your marshmallow block will look like. 
Cut into squares or use a cookie cutter to create fun shapes! Roll the marshmallows in powdered sugar to coat the sides. 


These were seriously delicious, they were pretty easy too!!


Try them out for yourself!!!


-Courtney 


Sunday, January 8, 2012

Happy New Year!

Hello Everyone! I hope you had a wonderful holiday season! I took a little unannounced and unplanned hiatus, but I am back and ready for action!  I'm no longer spending 10-20 hours a week in the car and am super excited for what this year will bring. Hopefully lots of time for blogging and travel!

I have a ton of good stuff planned for you guys this month. Including MARSHMALLOWS and CHILI!

I got some cool new baking stuff for christmas too and can't wait to share it with you all. I also bought myself a new camera, hopefully it will kick the quality of this blog up a little bit!


See you all later this week!


-Courtney

Friday, November 25, 2011

Pumpkin Bread

I hope everyone had an awesome Thanksgiving!

My family had an awesome day, and we sure didn't need anymore food in the house, but I just had to make this pumpkin bread.  

This is an old family recipe, and the terminology was a little funny on it. But it turned out great! This recipe makes 2 loafs and bakes at 350 degrees for 75 minutes.

Here is the recipe and how to:


Ingredient:

3 cups sugar
1 cup oil
4 eggs
2 cups of pumpkin puree
2/3 cups water
1 1/2 tsp. salt 
1 tsp. cinnamon
 1 tsp. nutmeg
2 tsp. baking soda
2 1/3 cups flour


Mix the sugar and oil.


Beat the eggs and pumpkin into the sugar and oil. 


Sift the flour, salt, nutmeg, cinnamon and baking soda into the mixture. 


Resist eating the batter and grease 2 loaf pans. 


Pour into the pans and bake at 350 degrees for 75 minutes. 


Okay I had wrote the first half of this blog while the bread was in the oven. 75 minutes was way too long! 

My bread also stuck to the pan :( 

However the bread was still really good! Just reduce the baking time and pour the batter slowly into the pan and everything should be ok! 


Hopefully everyone enjoy this at work tonight! 

-Courtney


Tuesday, November 22, 2011

Dinner is served part 2!

I don't mean to brag but, this dinner was FREAKING delicious!!!! 
Not to mention it was really easy! 

On Sunday night seven of us feasted on pan seared steaks with a wine sauce, potatoes, green beans, and mini pumpkin pie croissants. (These were seriously amazing warmed up and paired with a little vanilla ice cream! Thanks mom for making them!)

Searing all of the steaks took a little longer than I anticipated, and I found it was easier to just cut open the meat to check its color rather than using a thermometer.

Alright onto the food. I found this recipe in The America's Test Kitchen Family Cookbook. I think I said this the last time but I really like these cookbooks! This recipe serves four so make sure you make the necessary adjustments. 

Here is what you need:

Steaks:
4 boneless beef stakes about 1 inch thick trimmed.
1 tbs vegetable oil. 
Red Wine Sauce:

1tbs vegetable oil
1 shallot minced
3/4 cup low sodium chicken broth
1/2 cup dry red wine
2 teaspoons brown sugar
3 tbs butter, cut into 3 pieces and chilled
1 teaspoon minced fresh thyme


Pat the steaks dry with paper towels, and season with salt and pepper. 


Heat 1tbs of oil in a large skillet until the oil is smoking.
 Brown the steaks on the first side for about 4 minutes. 

Flip the steaks over and continue to let them cook to the desired doneness. 

Transfer the steaks to a plate and tent with foil for 5 minutes. 


For the sauce: add the remaining vegetable oil to the pan and heat. 

Add the shallot  and cook until soft (about 2 minutes)


Stir in the broth, wine  and brown sugar. 
Make sure to stir in any brown bits in the pan, they add flavor. 
Simmer until thickened. (mine never thickened, but it was still delicious)


Stir in any meat juice from the tented plate. 
Reduce the heat to low and whisk in the butter one piece at a time. 
Add the thyme after removing the pan from the heat. Salt and pepper to taste. 

Pour the sauce over the steaks before serving, or once its on your plate. :D 


Alright, a friend of mine told me that my sauce wouldn't thicken with out using a stainless steel pan. Somebody try it out and let me know! 

Tomorrow I hope to conquer the bangle, which I have high hopes for! That darn make-up bag, might end up in the trashcan, and those other 2 pumpkin recipes are calling my name. However the oven is going to be pretty full over the next few days. :( 

Keep checking back! I have 8 days to complete October's goals. Hopefully I can pull this off! 


-Courtney


Sunday, November 20, 2011

Snickerdoodles

It has been forever since I last posted. Sorry about that. I've been really busy with work,  and trying to get other things done.  In October I did raise money for Susan G. Komen by baking for donations. I was able to raise $174.00! I also perfected a new cupcake frosting! 

Alright here is a post so I can cross something off of last months list. SNICKERDOOLES! 

If you have never had a snickerdoodle I highly suggest making this recipe immediately, its probably one of the best ones around! I found this recipe in an old cookbook, the kind where everyone sends in recipes and then the school or organization has them printed and they sell them as a fund raiser. 

Its super easy, basically you could just throw everything in the bowl and mix but here is the play by play.

Ingredients:
1/2 cup margarine (I use butter) 
1/2 cup shortening
2 eggs
2 tsp. cream of tartar
1/2 tsp salt
2 tsp. cinnamon
1 1/2 cups sugar
2 3/4 cups flour
1 tsp. baking soda
2 tbs. sugar (set aside)

Mix thoroughly the margarine, shortening, sugar and eggs.


Blend in the flour, cream of tartar, baking soda, and salt. 


shape dough by rounded teaspoon or use a cookie scoop. 


Combine the cinnamon and 2 tbs of sugar and roll the dough in mixture. 


Bake at 400 degrees for 8-10 minutes and immediately remove from baking sheet. (This step is very important it prevents the cookies from becoming crispy.) Let cool and enjoy!  


Hopefully over the next few days I can finish up that make-up bag, decorate a bangle or two and make some pumpkin bread. The pancakes might have to wait until another day. Oh and that pan seared steak with a red wine sauce is for dinner tonight! Check back soon for that post! 

-Courtney