Search Her kitchen and crafts

Showing posts with label her kitchen and crafts. Show all posts

Sunday, September 23, 2012

Retro Recipe #1 Butter Cake


Alright guys here it is, the first Retro Recipe. 

If you are wondering what a Retro Recipe is click HERE

In an effort to avoid spending money and the grocery store I chose this recipe. 

In my Big Bag O' Recipes there were two Butter Cake recipes.

I chose the Mel Huther recipes because if was easier to read. 
Here's the breakdown:

PREHEAT YOUR OVEN TO 350°
Here is everything you need. See why I didn't have to go to thew store? 
Mix the first four ingredients together, the batter was very thick. 

Spread the batter into a 9X13 in greased pan

Insert image that I forgot to take here.

Next combine the last four ingredients together, slowly adding the powdered sugar so that your kitchen does not look like a crack house. 


Spread this sticky mixture over the batter. 


Bake at 350° for 40 minutes. When the recipe said exactly 40 minutes they weren't kidding. 
Thinking about it I could check to make sure the edges aren't getting to crispy around 35 minutes. 

Sprinkle with powdered sugar and let cool. 


Cut into squares and serve. 


This cake was very rich and moist. However it was missing something. I think next time I would serve it with fresh berries and maybe even whip cream. 


Do you have a favorite old recipe? Share it's name in the comments below! 


-Courtney 


Thursday, February 9, 2012

Checkered Cake

Hey everyone, welcome to the first official post of February, a few days late but its better than an empty promise!

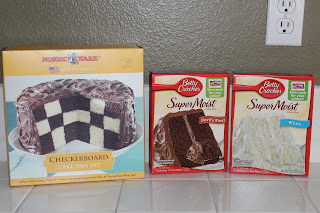
A year ago this month I received an awesome gift, a checker board cake pan set, before this cake I had only tried it once.  So last week, I "dusted" it off and get to work. I took the lazy route though and used boxes of cake mix to complete this project.

First things first, make sure you have everything you need!


Insert the divider into the pan and decide how you want to cake too look, you will have two layers that are patterned the same way. 

Fill your cake plans according to the plan, starting with the center, be careful not to let it drip into the center section too much! 
After you have completely filled you pan remove the insert carefully. Repeat this process until all 3 of your pans look something like this...


Bake your cakes according to the directions on the box. Lightly frost between the layers of the cake, and frost the outside as you normally would. I chose a homemade chocolate buttercream because its delicious!  

When your through, enjoy the beauty of your cake! 


This is a really simple and fun way to impress people. The hardest part really is filling the pan! I ended up pouring my batter into measuring cups with a pour spout. 


-Courtney

P.S. I totally tried to make my white cake pink by using a bit of red food coloring. It would have turned out better if I'd have used pink, however my dog decided to eat my pink food coloring right before I used it. 


Sunday, January 29, 2012

Homemade Marshmallows

So about a year ago, I was researching how marshmallows are made.  Then I stumbled upon a post on Smitten Kitchen about making your own marshmallows. I found my recipe there although I have seen it in several other places. This was pretty easy until I did not let the sugar and gelatin mixture mix long enough. I didn't notice and continued to make the marshmallows. So I had to try it again, the first portion of the pictures are from my first attempt, the rest from the second. Here goes nothing! 


Ingredients: 
Approximately 1 cup powdered sugar
3 ½ envelopes unflavored gelatin
1 cup cold water
2 cups granulated sugar
 ¼ tsp. salt
2 large egg whites
1 tbsp. vanilla
A few drop s of food coloring to spice things up
9x13 in. pan and a standing mixer or hand mixer. 


Your first step is going to be to oil your pan and sprinkle powdered sugar on top of it.  Make sure to get the sides too.


Pour 1/2 the water into the mixing bowl and sprinkle the gelatin over it.


In a sauce pan heat the sugar, corn syrup, 
the second half of the water, and salt on low heat.  
Stir with a wooden spoon until the sugar is dissolved. 
Increase the heat and boil the mixture until the temperature reaches 240 degrees. 
This took me about 10 minutes. 


Pour the mixture over the gelatin mixture. Stir until the gelatin is dissolved. 


Beat the mixture until it is 3x its original size. (This is where I went wrong the first time.)
Beat the egg whites until they hold stiff peaks.
Mix the egg whites and vanilla into the mixture.


Pour the mixture into the pan and sprinkle powdered sugar over the top.
Refrigerate for at least 3 hours.
All picture above are from attempt #1, looking back on this photo I should have known they weren't going to turn out.


When done properly this is what your marshmallow block will look like. 
Cut into squares or use a cookie cutter to create fun shapes! Roll the marshmallows in powdered sugar to coat the sides. 


These were seriously delicious, they were pretty easy too!!


Try them out for yourself!!!


-Courtney