Search Her kitchen and crafts

Thursday, September 29, 2011

Craft of the month: a pencil/make-up bag.

Okay. I hope you guys are ready for this!  This is the last post for September. 

First a little background information. I don't sew. It took me forever to figure out where to start on this project. It was almost comical. 

Are you ready to see it? 


Womp. Womp. Womp. 
I was having such a hard time just getting to here, there are just not enough hours in a day. I will finish it though. Eventually. 

When it's done I'll attempt to post a tutorial. That is if I can remember what I did. 

-Courtney


Pie crust and an apple pie how to

Okay guys, this was supposed to be the last apple recipe of the month, however the apple pie its self was not that great. So I thought I would share with you how to make the crust, and the basics of assembling an apple pie. 

While researching this post I learned that the key ingredient to a great pie crust is
  VERY COLD INGREDIENTS

I used Ina Garten's recipe for perfect pie crust. 


The recipe calls for:
  • 12 tablespoons very cold unsalted butter (diced) 
  • 3 cups all-purpose flour
  • 1 teaspoon kosher salt
  • 1 tablespoon sugar
  • 1/3 cup very cold vegetable shortening
  • 1/2 cup ice water
  • A food processor
  • A rolling pin
  • A clean flowered surface
  • Saran wrap

Place the flour, salt, and sugar in the food processor pulse a few times giving it a good mix.  Add the butter and shortening. Pulse a few more times until the butter is the size of peas. 


With the food processor running, pour the ice water down the feed tube and pulse the machine until the dough begins to form a ball. 


Divide the dough into two halves, wrap in saran wrap and refrigerate for 30 minutes. 


Roll out one half of the dough on a flowered surface. 


Place the crust in the pie pan. 


Fill the pie pan. 


Roll out the other half and roll it onto the rolling pin. This will make it easier to lift the dough. 


Pinch the pie closed using your fingers or a fork. 


Check the recipe for bake time and temperature. Let bake and enjoy! 

Here's a tip.....wrap the endges of the pie in foil, and make sure you coat the entire top in an egg wash.

Don't forget to enter the give away! It closes on 10/5 at 12:01 am. 

-Courtney 

"I'm not easy to understand, but you know me like the back of your hand." - Miranda Lambert


Wednesday, September 28, 2011

Cookie of the month: Jumbo Black Bottom Macaroons

Hey everyone, I still have 2 more posts to do and 2 days to do it! 
I'm going to warn you right now, October is going to be really rough on me. I will be working about 50hrs a week so bear with me! 

On to the Cookies!!! 

A couple of years ago one of my wonder ful college roommates gave me Big Fat Cookies a wonderful cookbook full of easy to follow recipes and pictures. This is the first recipe I tried and these cookies are so DELICIOUS. 

Here's how to make them.

Preheat the oven to 350 degree, line a baking sheet with parchment paper and butter the paper. 

Cookies:
7oz bag of sweetened coconut
1/2 cup sweetened condensed milk
1/8 tsp salt
11/2 tsp almond extract
1/2 tsp vanilla extract
1 large egg white
pinch of cream of tartar
1 tbs sugar

Chocolate coating:
9 oz semisweet chocolate chopped
1tbs canola oil


In a large bowl, combine the coconut, condensed milk, salt, almond extract and vanilla extract.

In a medium bowl use a mixer and beat the egg white with cream of tartar until they are foamy. Beat until soft peak forms, beat in sugar. 

Use a rubber spatula to fold the egg mixture into the coconut mixture. 

Using a cookie scoop, ice-cream scoop or 1/4 cup scoop the batter on to a prepared baking sheet. 


Bake for approximately 17 minutes or until the tips of the coconut are light brown. Let the cookies cool completely. 


Melt the chocolate and conola oil into a double boiler. Don't have a double boiler? Click here for ideas.


Dip the bottom of each cookies into the melted chocolate mixture. Set on wax paper, and let them harden. To speed up this process place them in the refrigerator. 

Enjoy!!! 


A few tips. 
1. Place the cookies on wax paper after dipping them in chocolate, if not when you remove the cookie from the pan you'll loose all the chocolate. :( 

2. Make more than one batch. The batch I made only made 14 cookies. 

Don't forget to enter the giveaway

-Courtney


Wednesday, September 21, 2011

1,000 Page views!

Wow! I can't believe it it. This little blog of mine has been viewed 1,000 times! 

Thank you everyone, I wouldn't be here if it weren't for you.

In order to celebrate this event here is the blogs frist giveaway!


How to enter:

Leave a comment below with your name, email, and prize you'd like to win.


Prizes:

$10 gift card to Target, Michaels, or Joanns.

A batch of snickerdoodles or tripple chocolate cookies.

A set of purple coasters.

A set of 10 decorated thumbtacks.


The winner will be chosen by using this random integer generator.

You have until Wednesday 10/5 to enter to win!


-Courtney


Dinner is served!

This months dinner was supposed to be Julia Child's Beouff Bourginion. As I attempted this recipe my kitchen became Improvise Central.  
After trying to write about my cooking attempt. I have decided that although I may have used her recipe from "Mastering the Art of French Cooking" I definitely did not follow her directions.  Since I know nothing about cooking and I didn't exactly follow the recipe, I am having a very hard time explaining what to do. 

Below are pictures I took during my attempt. I have added captions so you can kind of figure out what I was doing. 
Ingredients minus the mushrooms and sub bacon for a bacon rind


chop the bacon

the veggies too

This is where my dog Zoey likes to lay. I was using the stove, the counter to the right of the stove and the center island. Needless to say she was in the way. 

Brown the beef.

cook the veggies.

cook for a long time. 

use a bigger pot, and one that can go on the stove.

My version of a sieve set.

We had to eat this the next night for dinner because it took so long to cook!


Apparently I have learned a lot this month because I've said I learned a lot in all of my posts this month. 

Well here is what this post taught me.
1: Read the ENTIRE recipe before staring. 
2: Make sure you have all of the necessary gadgets before starting
3: Make sure you have enough time. 
4: If it doesn't turn out you can always order pizza. 
5: Make sure you understand the recipe. 

I took so long to make dinner that we had to eat it the next night. It was delicious though! I am definitely  going to stick to easier recipes for now. At least I can cross one thing off my bucket list. 

Bon Appetit!

-Courtney 


Tuesday, September 20, 2011

Apple Struddel

Hey everyone welcome back. I am still working on the timing of theses posts. I need to do about 1.5 a week in order to get all of the done for the month and its proving to be a little difficult. Anyways onto the fun stuff. 

This is the second baking post of the month, and here I made apple strudel.


Here is what you'll need:
1/2 cup golden raisins
2 TBS apple cider (I used Martinelli's) 
1/4 fresh white bread crumbs (put a slice of white bread in the food processor!)
1 stick of butter
2 Golden Delicious apples peeled and sliced 1/4 inch thick
1 Mcintosh apple peeled and sliced 1/4inch thick
1/4 cup & 2 tsp granulated sugar
1 tsp fresh lemon juice
1/4 tsp cinnamon
1/8 tsp salt
10 sheets fillo dough

Step 1: bring the raisins and the cider to a simmer. remove from heat and let sit. 
Step 2: Toast the bread crumbs in 1 TBS butter. 
Step 3: Drain the raisins, discard any remaining liquid.  Stir in the apples, 1/4 sugar, lemon juice, cinnamon, salt and bread crumbs. 


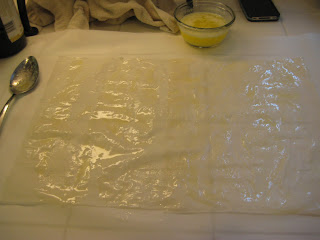
Step 4: layer your fillo dough by laying down one sheet and brushing it with butter. Repeat nine more times. 


Step 5: Fill the fillo dough with the apple mixture. Leave enough room to fold over the sides.  
To fold your dough first fold the long sides in, then fold over the bottom. After the left, right and bottom sides are folded over. turn the envelope over its self.  (I really don't think that made sense and I can't seem to find a good how too. GOOD LUCK)


Step 6: make 1inch slits in the top. 
Step 7: Bake at 475 degrees for 15 minutes, turning it half way through. 


This strudel was good, however the apples were not very soft. Here is what I would have done differently. I did not have a brush to brush on the butter so I attempted to spoon in on causing me to use way to much butter. Lesson learned buy a brush.  I also learned to not put the pastry in a tupperware container. It turned into a huge gooey mess. I also would have sprinkled the top with powdered sugar. 
Oh one more tip. Let your fillo dough though on the counter for a few hours before trying to work with it! 


-Courtney 


Sunday, September 4, 2011

Apple Muffins

Hey everyone, 

Well I promised you a post about apple muffins and here it is! 

I found this recipe on a blog called The Girl Who Ate Everything. (check it out, I fell in love with her.)
 In a desperate attempt to try new recipes she asked readers to email her their favorite recipes, this one is one of those recipes. 

Lets get started! 
Ingredients


1 ½ cups sugar
2 eggs
1 cup oil
1 tablespoon vanilla
3 cups flour
1 teaspoon salt
1 teaspoon baking soda
1 teaspoon cinnamon
3 cups peeled, cored, diced apples (I used about 2 ½ apples)
Brown sugar for topping 


Cream together sugar, eggs, oil and vanilla. 


Sift together flour salt, baking soda, and cinnamon. 

Mix thoroughly

Mix in the apples. I had to mix it with my hands because the batter was so thick!

Divide the batter into a lined muffin pan evenly. Sprinkle with brown sugar.

Bake at 350 degrees for 18-24 minutes. 

Let cool, and enjoy! 

A few tips: don't let your muffin mix sit in the paper liners for too long before baking, the moisture from the batter will absorb into the paper. While in the oven, the liners will the become very crispy. Tip #2: If you're going to use a metal muffin pan try putting a cookie sheet underneath. My muffins from the metal tin turned out a litte dry! Tip #3 let them cool completely before storing them in an air tight container, mine became sticky and sweaty. 

Despite my mishaps these muffins were delicious and a real hit! 

-Courtney